Spring Batch Multi Thread Processing 내용 정리
AsyncItemProcessor, AsyncItemWriter
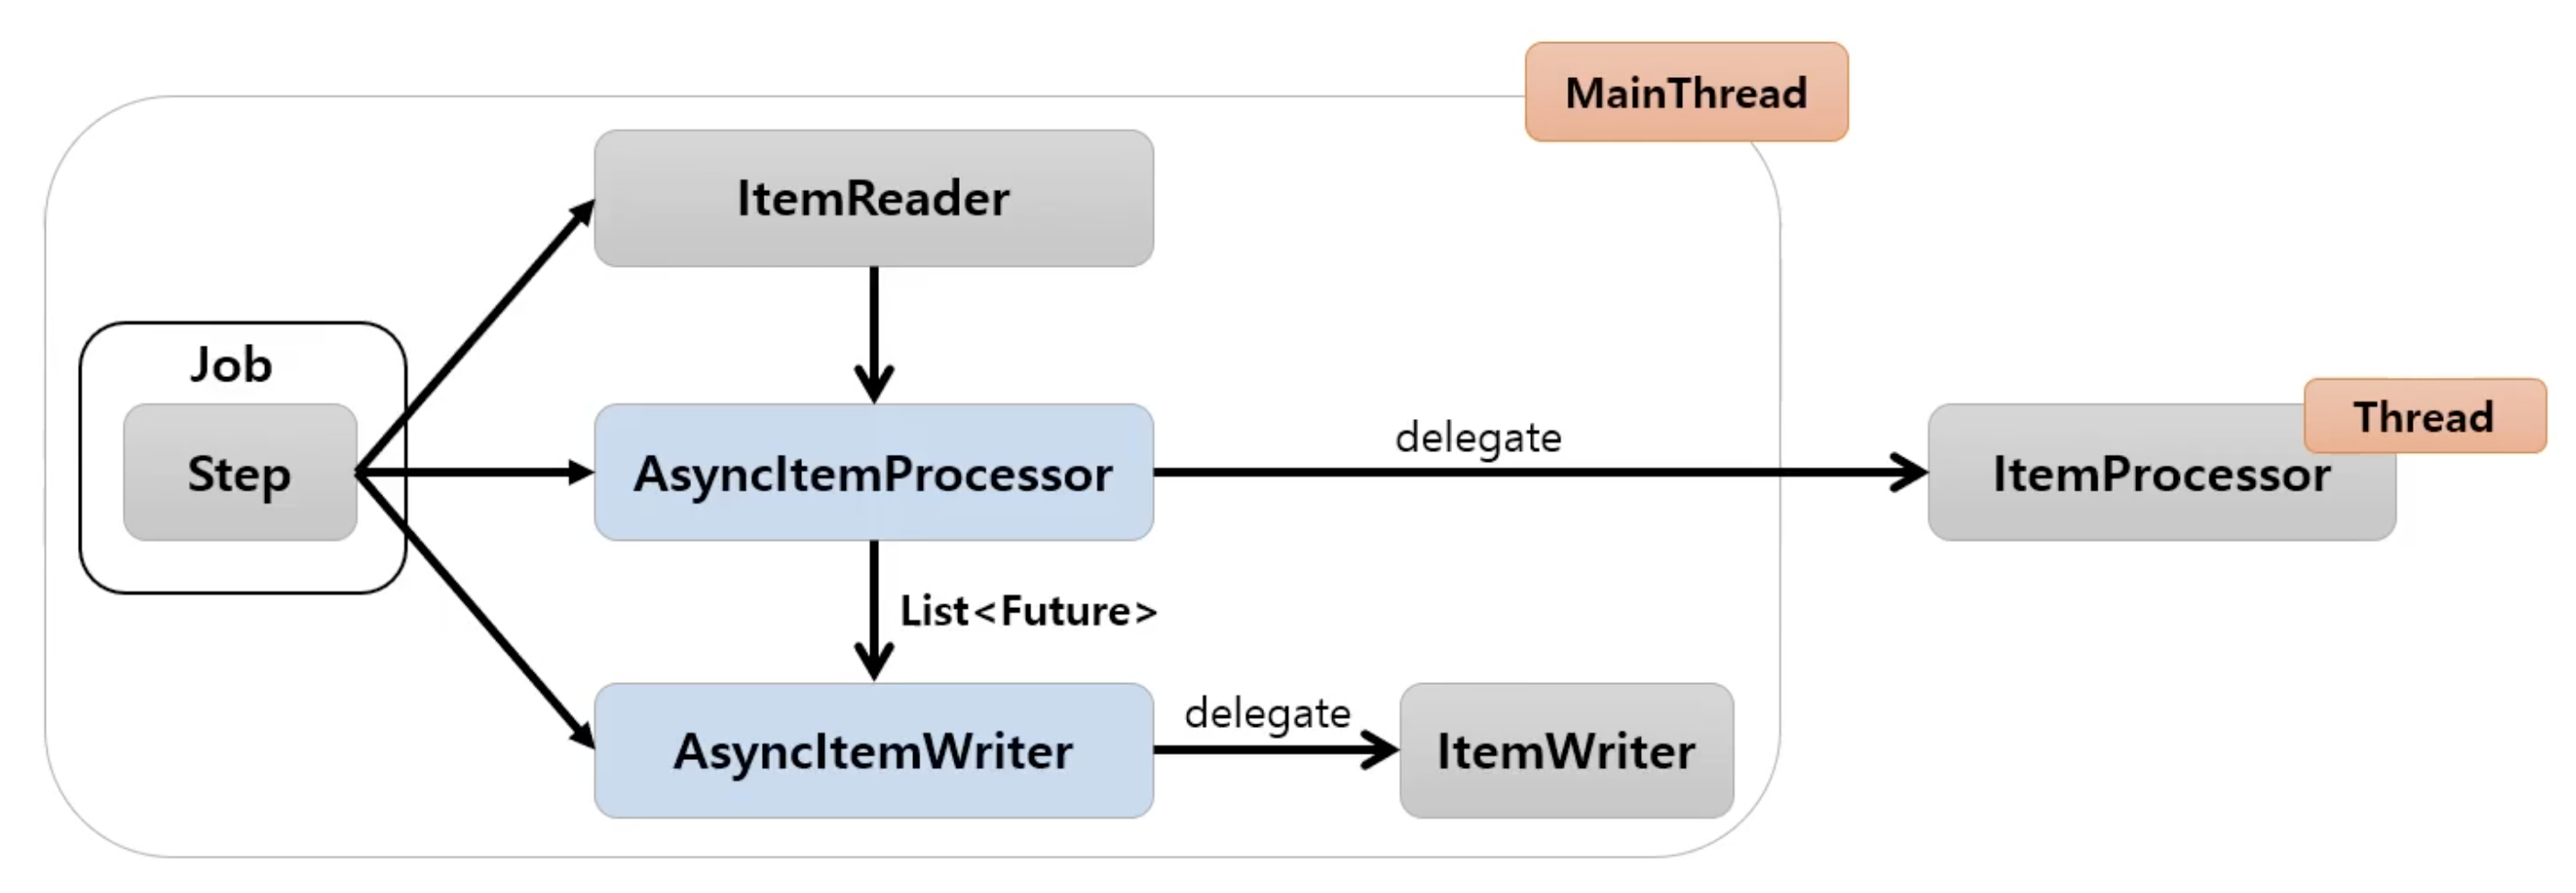
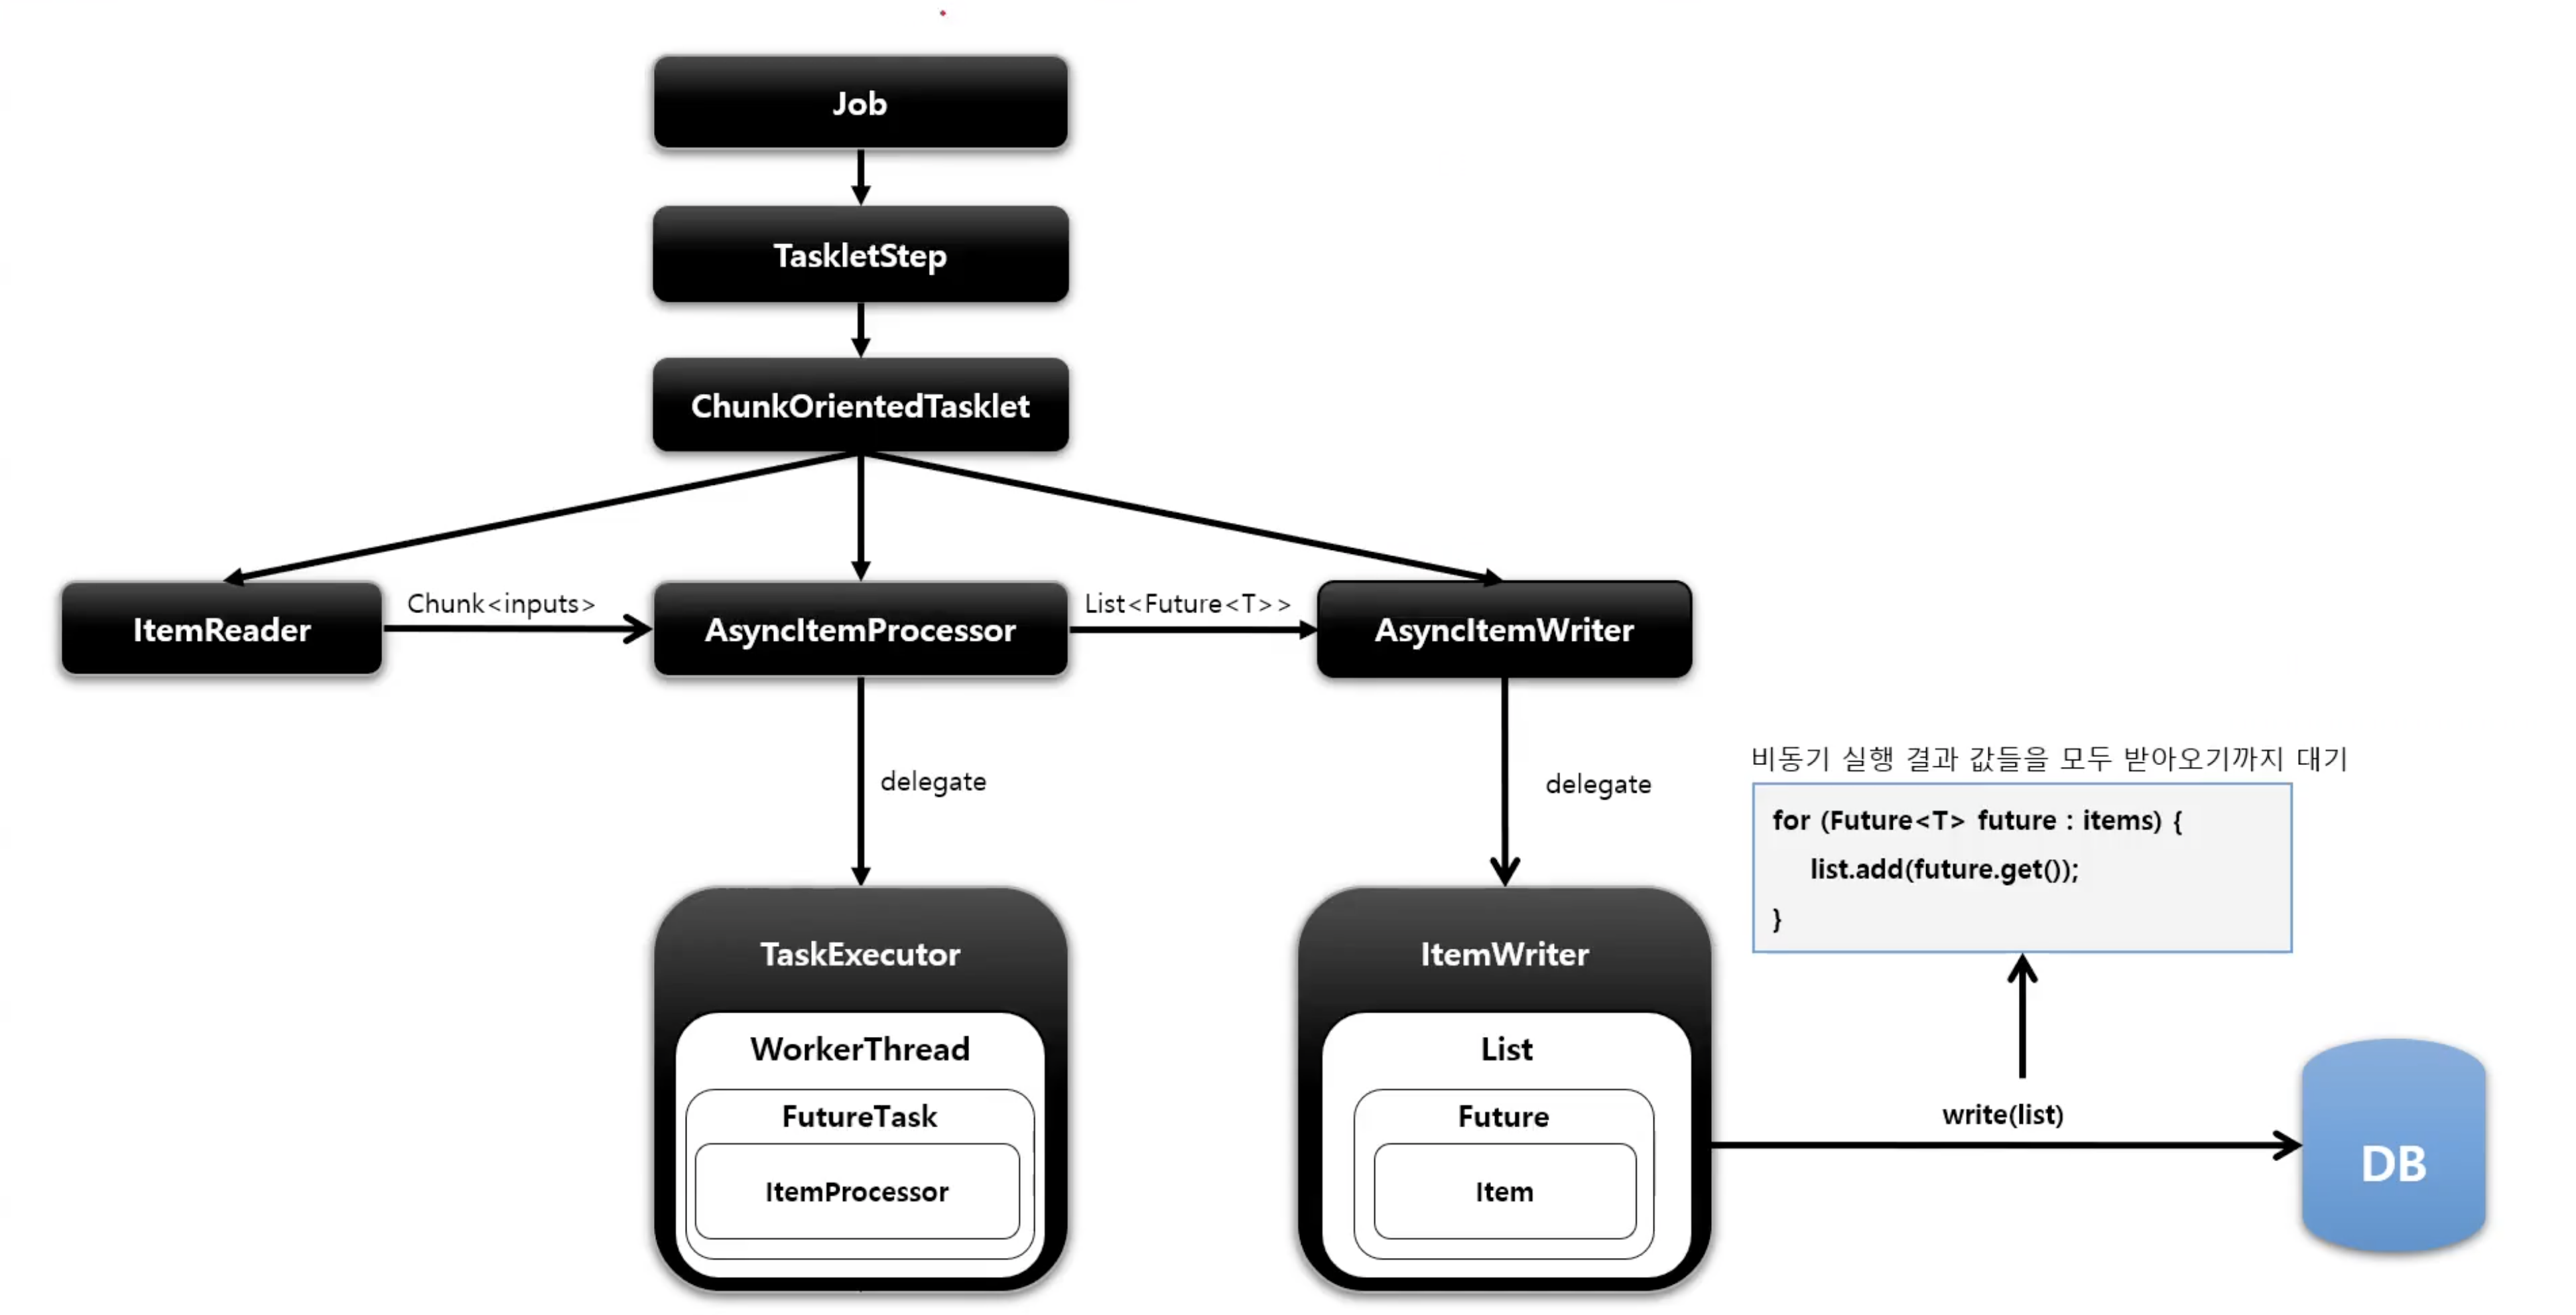
- Step 안에서
ItemProcessor가 비동기적으로 동작하는 구조 AsyncItemProcessor와AsyncItemWriter가 함께 구성이 되어야 함AsyncItemProcessor로 부터AsyncItemWriter가 받는 최종 결과값은List<Future<T>>타입이며 비동기 실행이 완료될 때까지 대기한다- spring-batch-integration 의존성 필요
public Step step() throws Exception {
  return stepBuilderFactory.get("step")
                                        .chunk(100)
                                        .reader(pagingItemReader())    //비동기 아님
                                        .processor(asyncItemProcessor())
    /*
    쓰레드 풀 개수만큼 쓰레드 생성되어 비동기로 실행,
    내부적으로 실제 ItemProcessor에게 실행 위임하고 결과를 Future에 저장
    */
                                        .writer(asyncItemWriter() // 비동기 실행 결과 값들을 모두 받아오기까지 대기함. 내부적으로 ItemWriter실행
                                        .build()
}
@Bean
public Step asyncStep1() throws Exception {
return stepBuilderFactory.get("asyncStep1")
.<Csutomer, Customer> chunk(100)
.reader(pagingItemReader())
.processor(asyncItemProcessor())
.writer(asyncItemWriter())
.build();
}
@Bean
public AsyncItemProcessor<? super Customer, ? extends Customer> asyncItemProcessor() {
AsyncItemProcessor<Customer, Customer> asyncItemProcessor = new AsyncItemProcessor<Customer, Customer>();
asyncItemProcessor.setDelegate(customItemProcessor());
asyncItemProcessor.setTaskExecutor(new SimpleAsyncTaskExecutor());
return asyncItemProcessor;
}
@Bean
public ItemProcessor<Customer, Customer> customItemProcessor() throws InterruptedException {
return new ItemProcessor<Customer, Customer>() {
@Override
public Customer process(Customer item) throws Exception {
return new Customer(item.getId(), item.getFirstName().toUpperCase(), item.getLastName().toUpperCase(), item.getBirthdate());
}
};
}
@Bean
public AsyncItemWriter asyncItemWriter() {
AsyncItemWriter<Customer> asyncItemWriter = new AsyncItemWriter<>();
asyncItemWriter.setDelegate(customItemWriter());
return asyncItemWriter;
}Multi-threaded Step
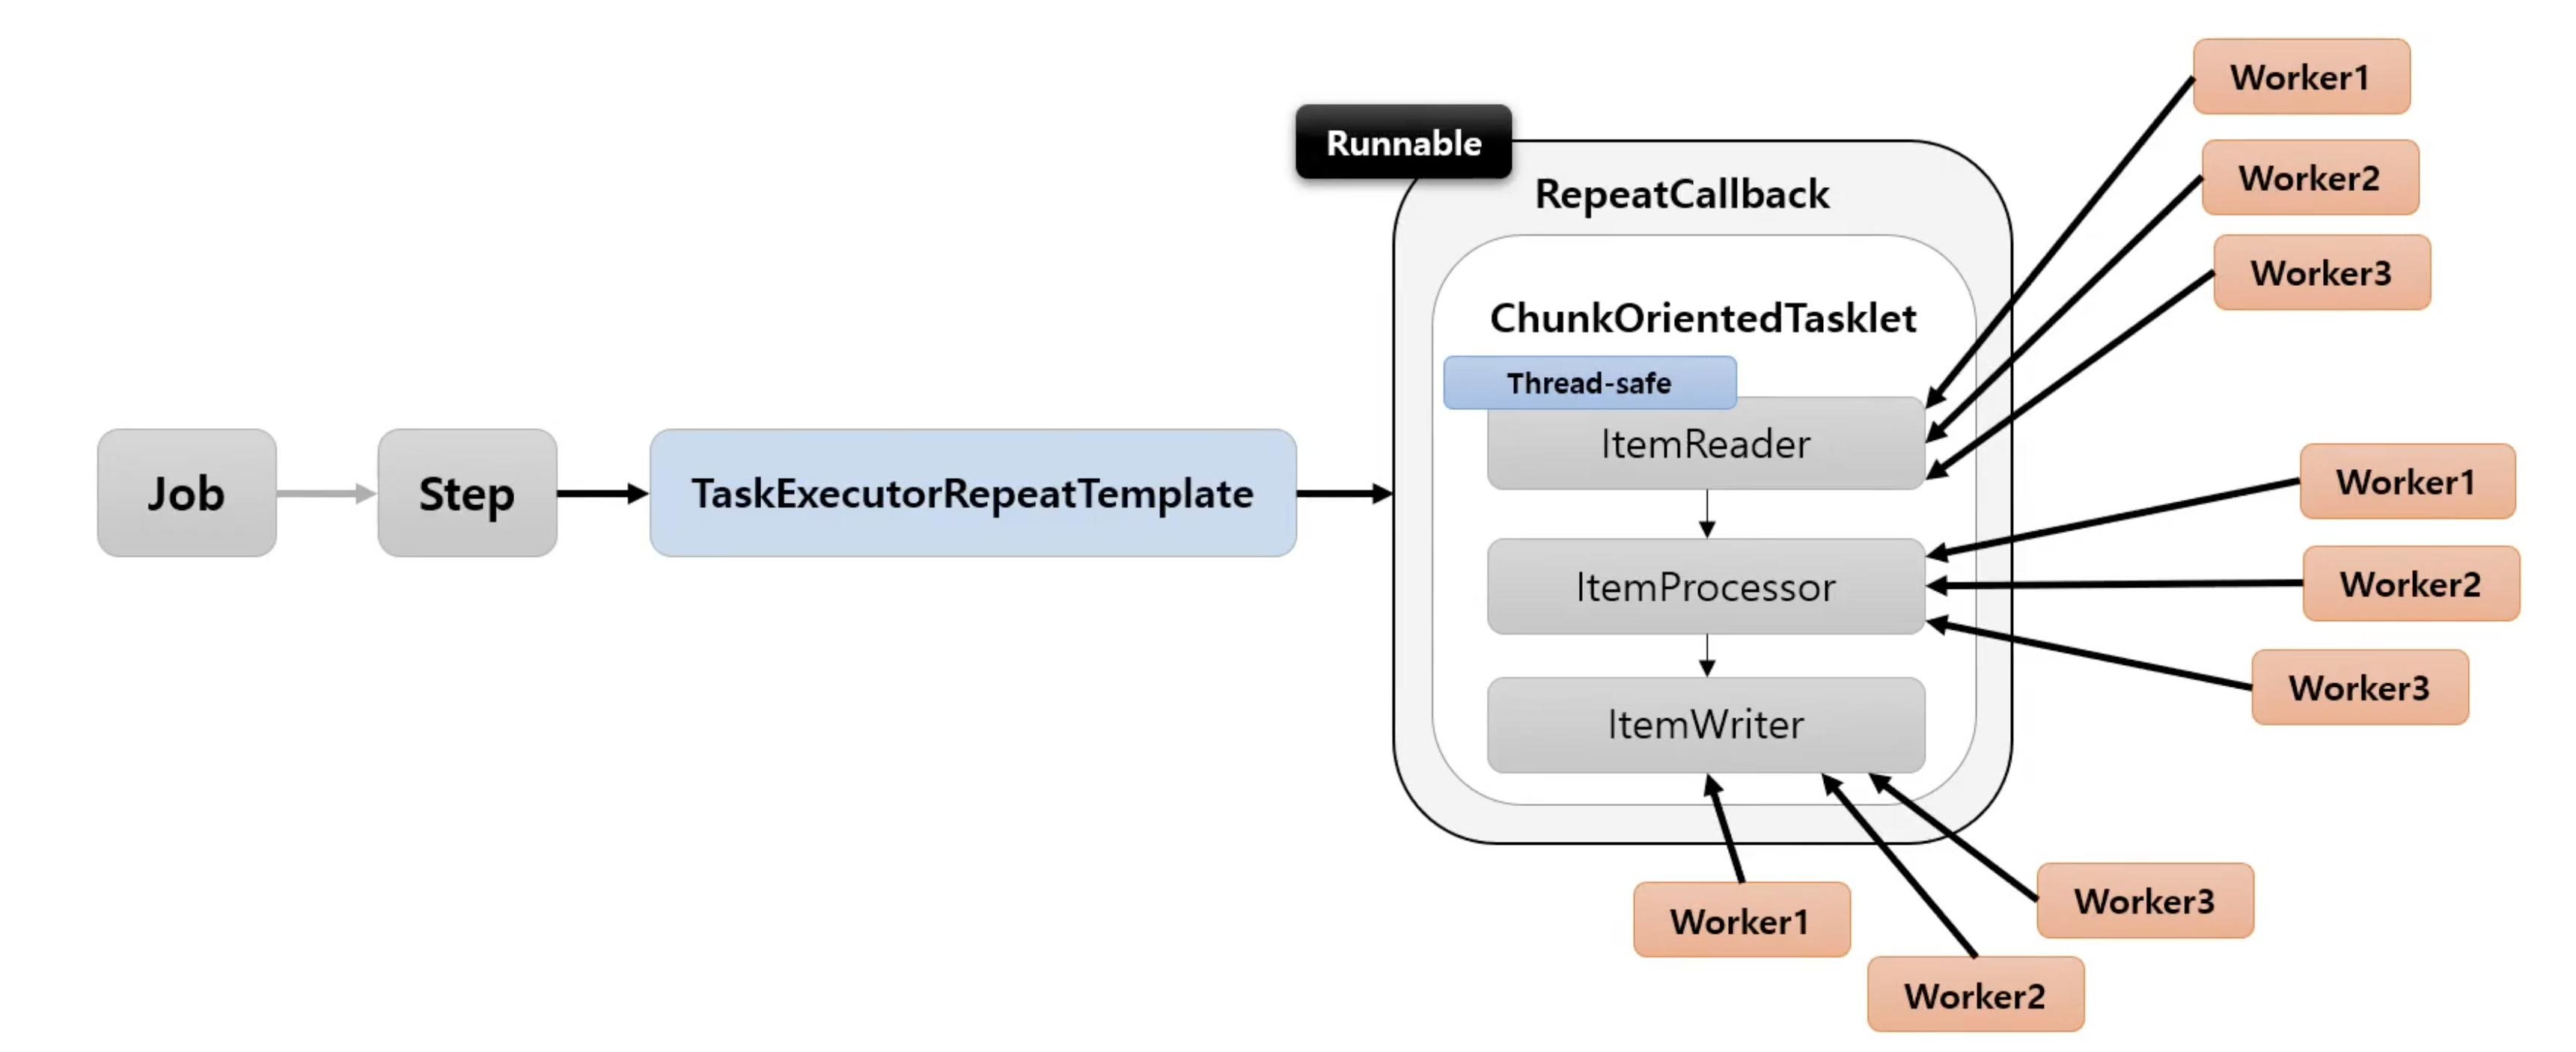
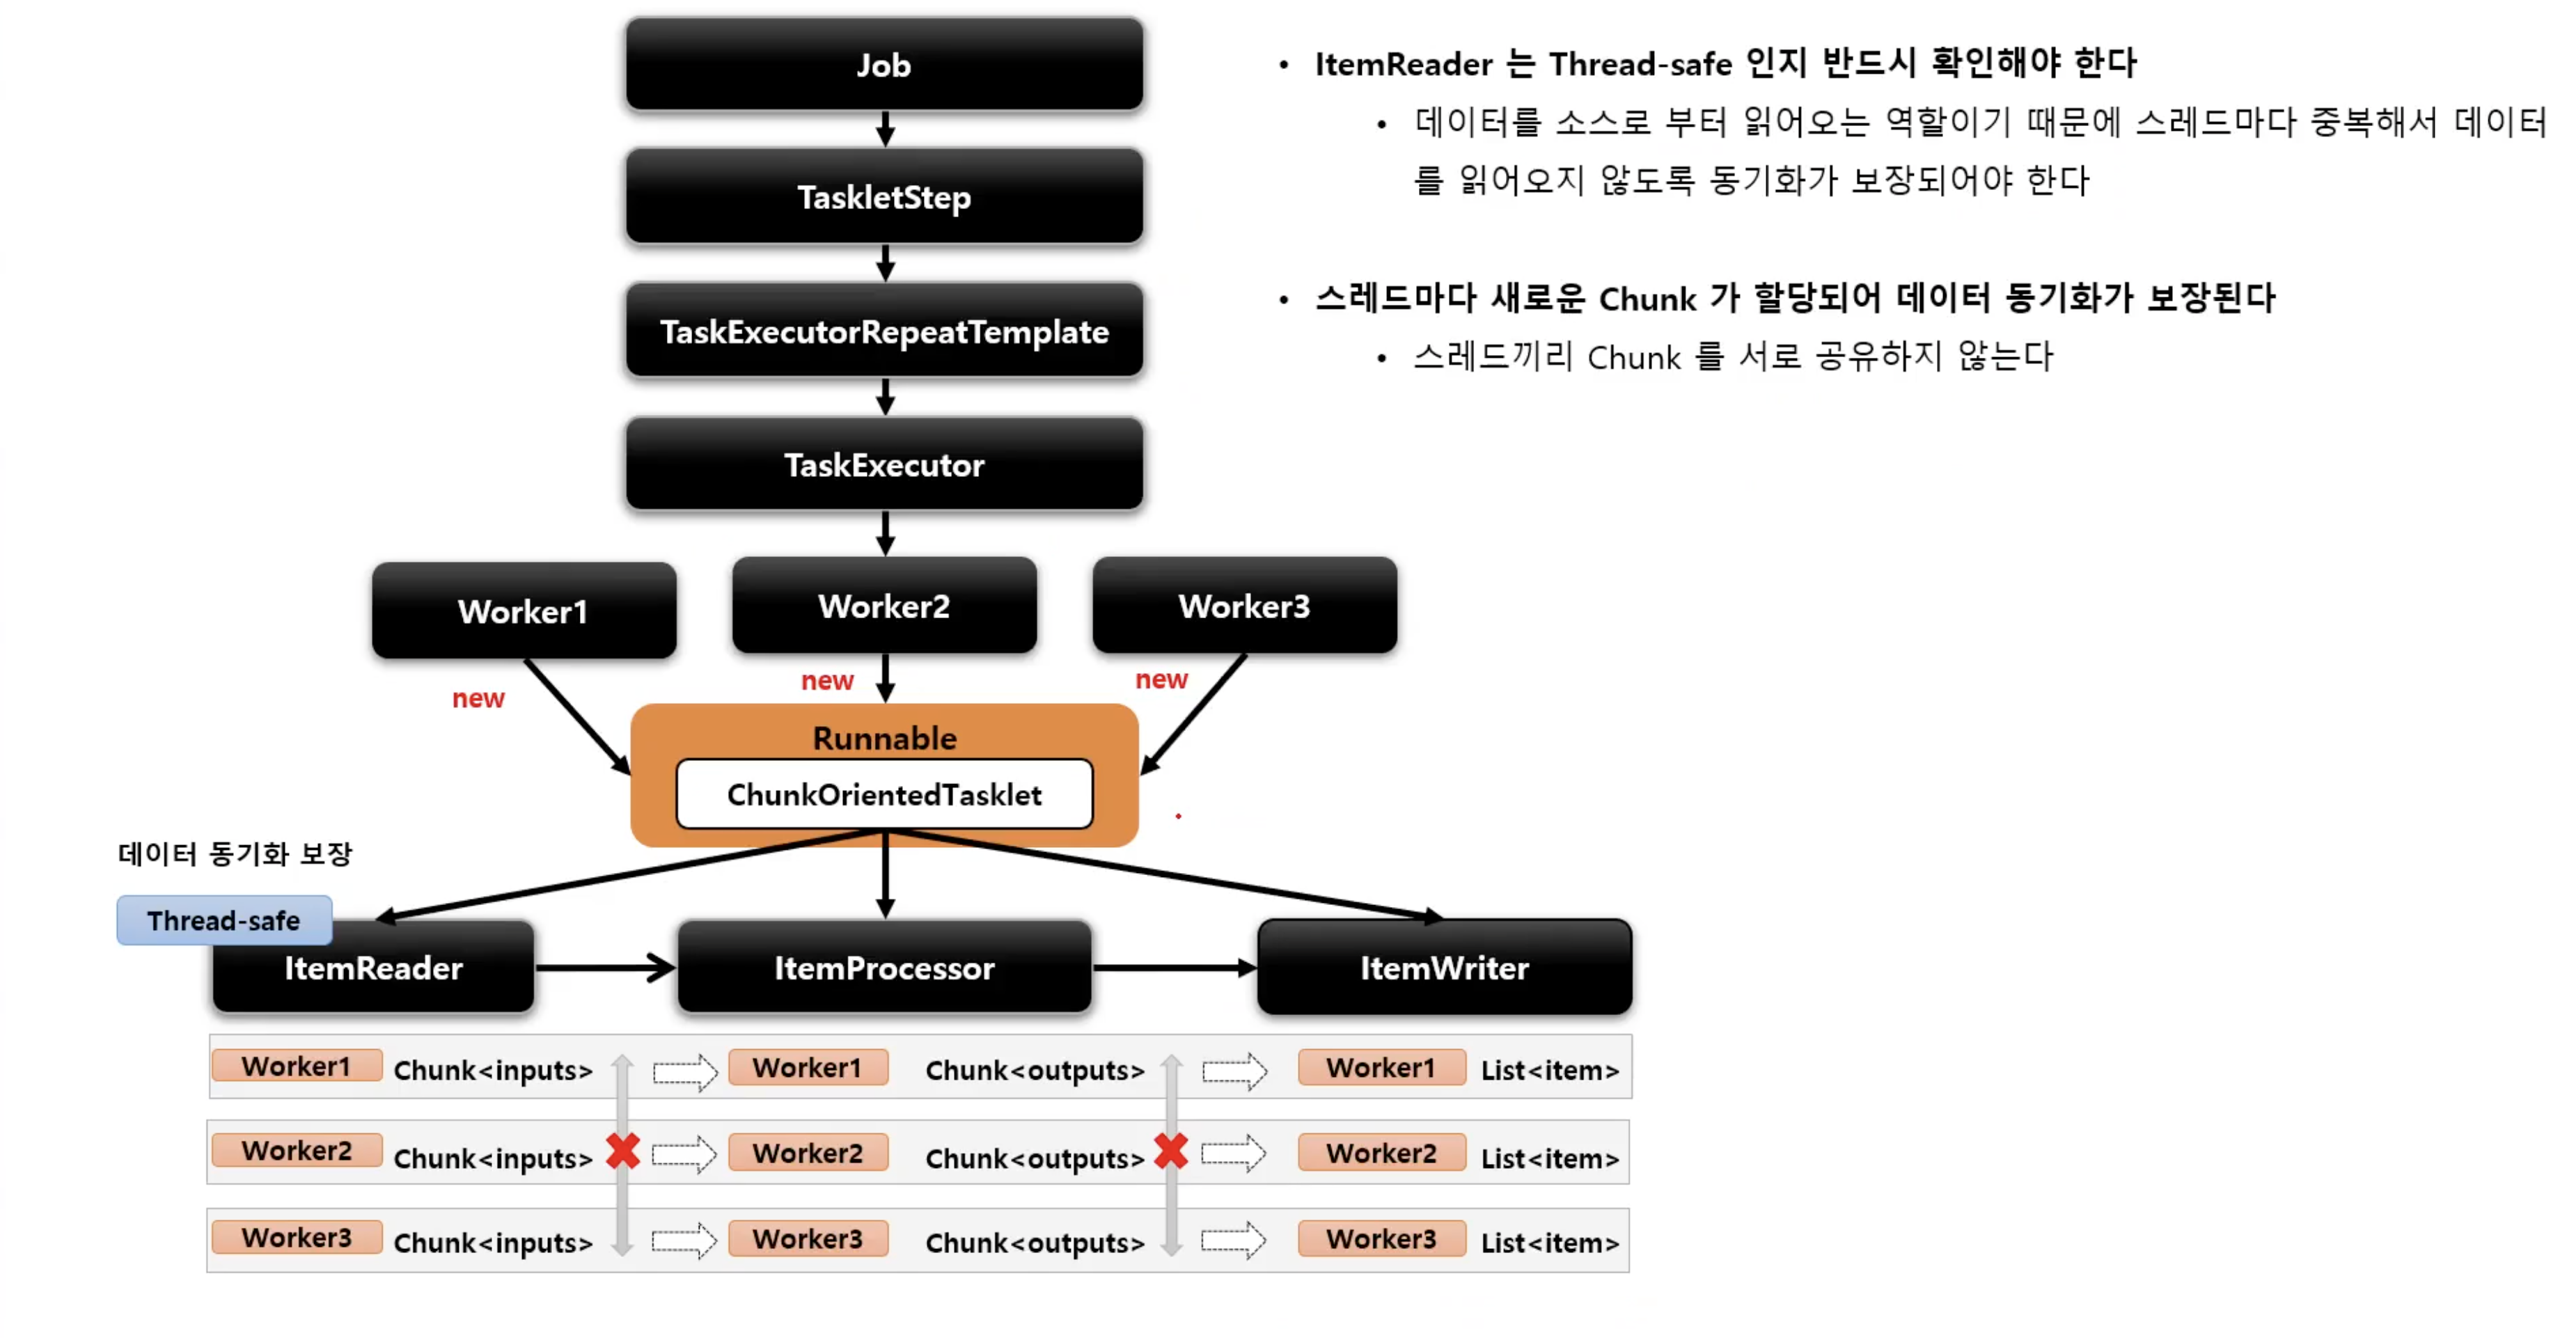
- Step 내에서 멀티 스레드로 Chunk 기반 처리가 이루어지는 구조
TaskExecutorRepeatTemplate이 반복자로 사용되며 설정한 개수(throttleLimit) 만큼의 스레드를 생성하여 수행한다
@Bean
public Step step() throws Exception {
    return stepBuilderFactory.get("step1")
            .<Customer, Customer> chunk(100)
            .reader(pagingItemReader())
            .processor((ItemProcessor<? super Customer, ? extends Customer>) item -> item)
            .writer(customItemWriter())
            .taskExecutor(taskExecutor())
            .build();
}

@Bean
public TaskExecutor taskExecutor() {
    ThreadPoolTaskExecutor taskExecutor = new ThreadPoolTaskExecutor();
    taskExecutor.setCorePoolSize(4);
    taskExecutor.setMaxPoolSize(8);
    taskExecutor.setThreadNamePrefix("async-thread");

    return taskExecutor;
}taskExecutor를 지정하지않으면 default로는 SyncTaskExecutor가 지정이 된다. 위 코드에서는 ThreadPoolTaskExecutor를 지정해서 청크별로 비동기적으로 동작하게끔 만들었다. 이때, ItemReader는 동기화가 보장되게끔 만들어야 한다. JdbcPagingItemReader나 JpaPagingItemReader를 사용하면 이를 보장해준다.
Parallel Steps
- SplitState 를 사용해서 여러 개의 Flow 들을 병렬적으로 실행하는 구조
- 실행히 다 완료된 후 FlowExecutionStatus 결과들을 취합해서 다음 단계 결정을 한다
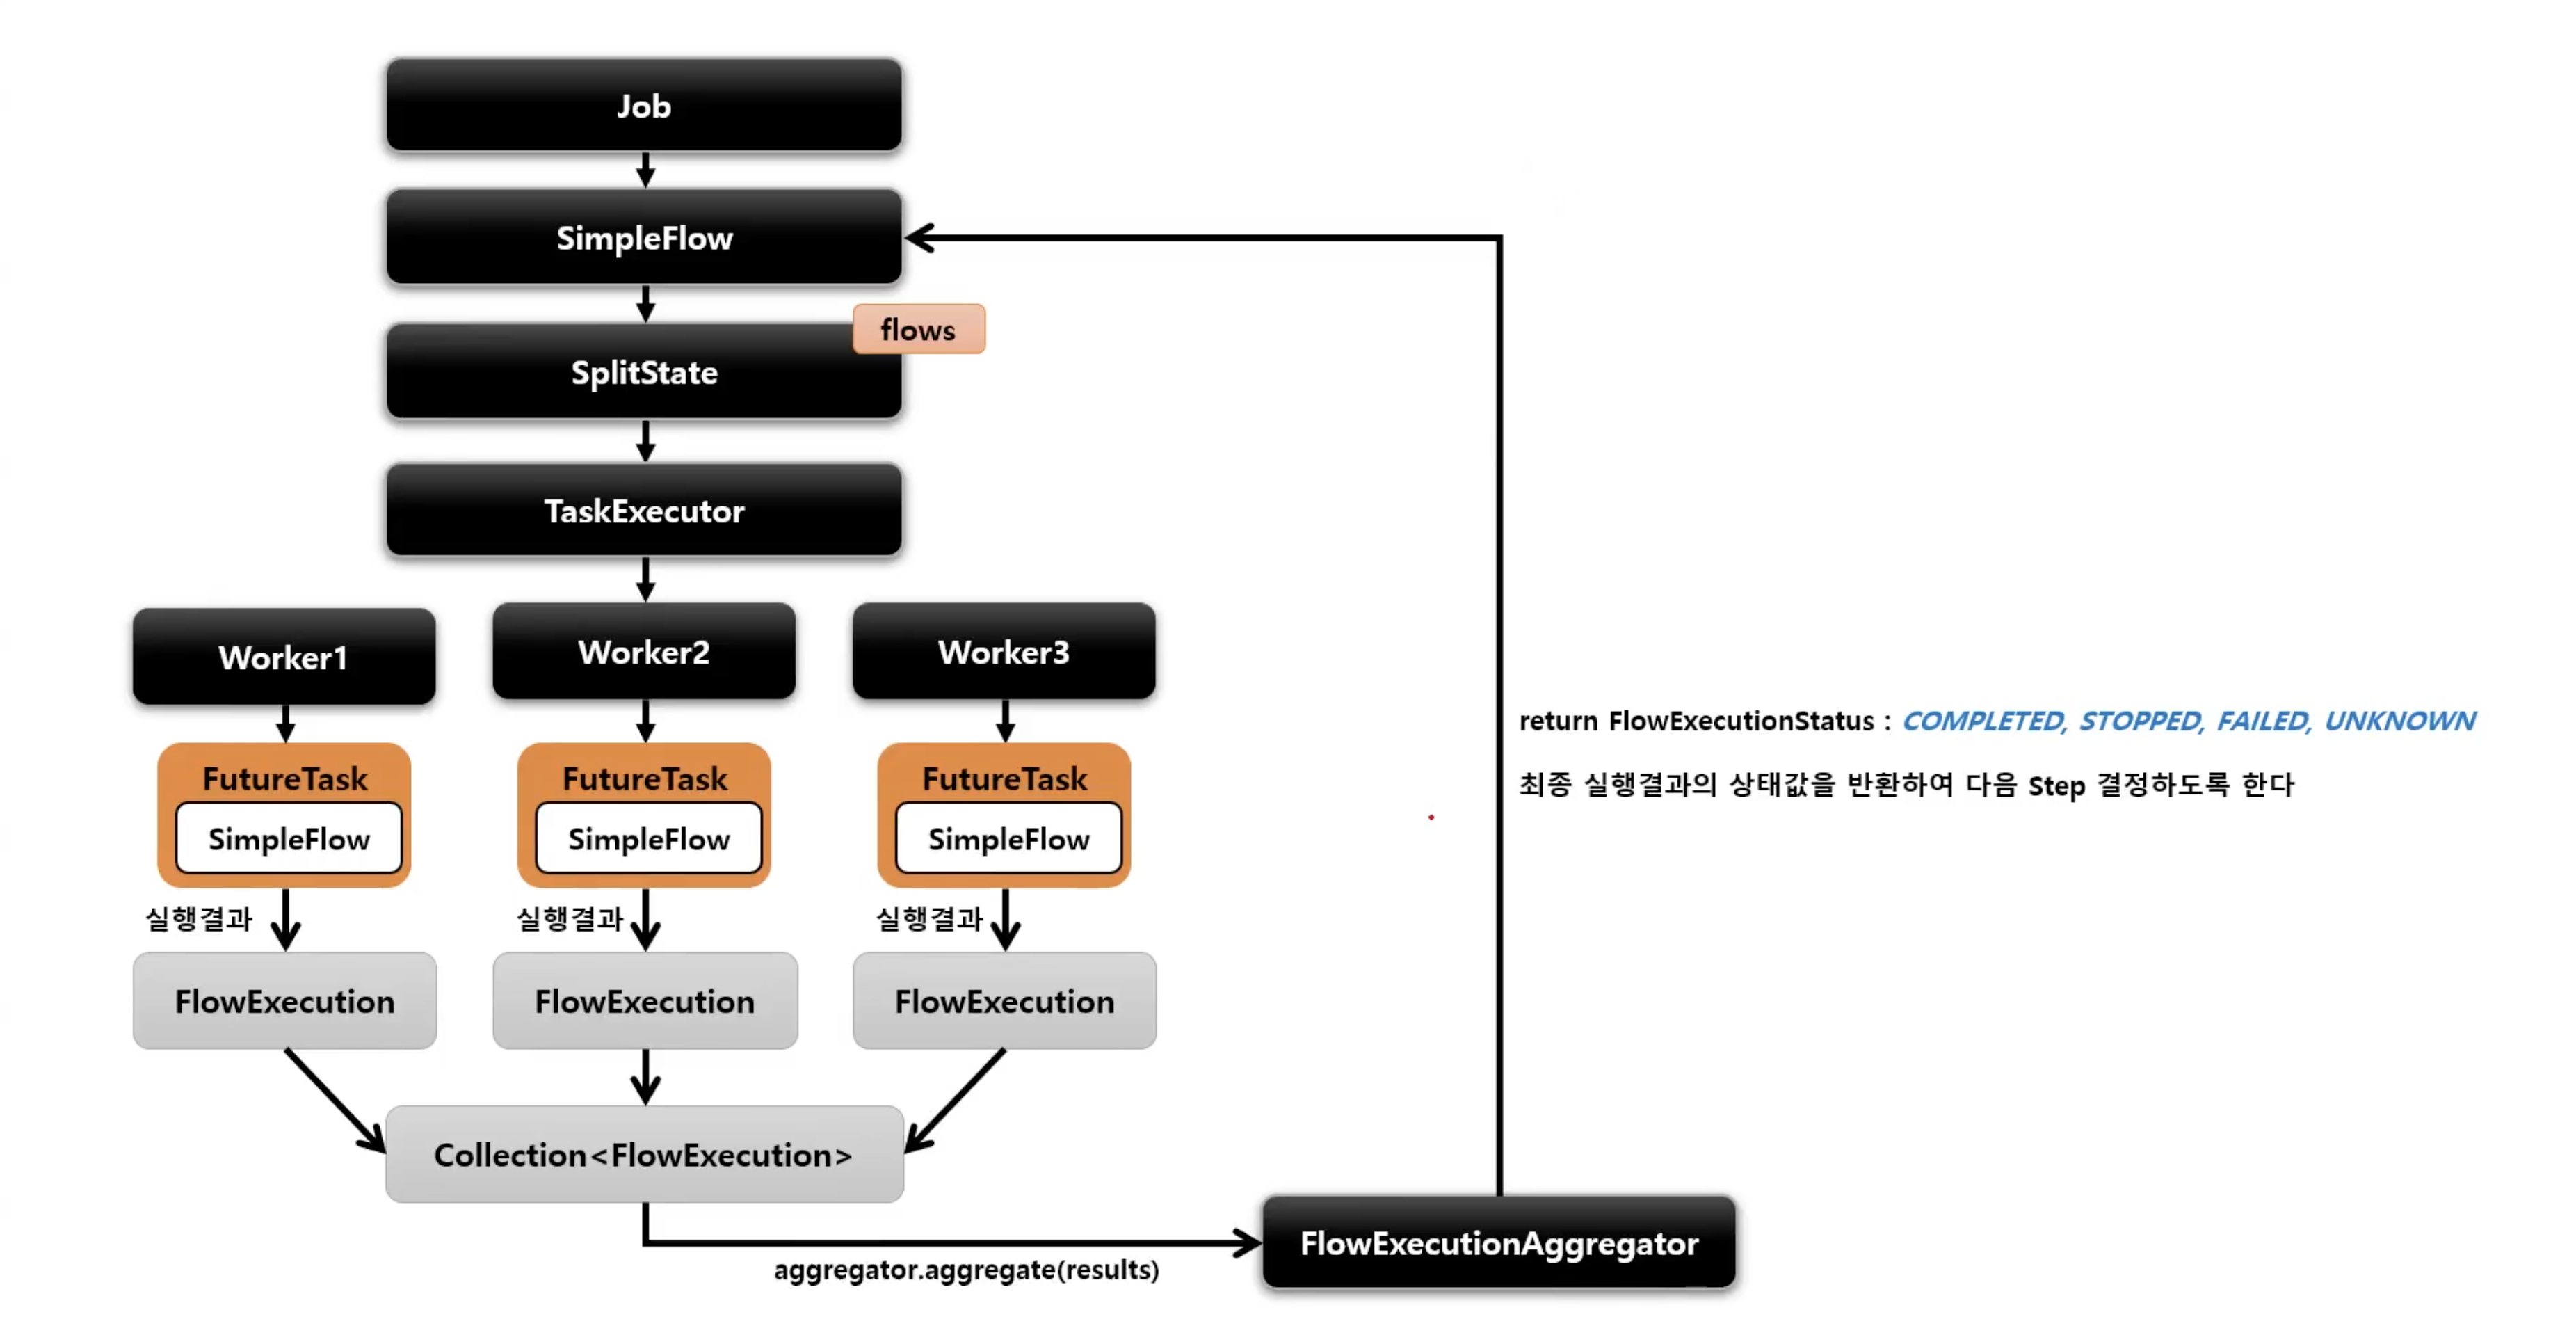
public Job job() {
      return jobBuilderFactory.get("job")
                                      .start(flow1())        //flow1 생성
                                      .split(TaskExecutor).add(flow2(), flow3())
                                      //flow2, flow3 생성 후 합침, taskExecutor에서 flow 개수만큼 스레드 생성하여 실행
                                      .next(flow4())
                                      //위의 split이 완료된 후 실행
                                      .end()
                                      .build();
}
실제 코드로 살펴보자
public Job job() throws RetryableException {
    return jobBuilderFactory.get("Job")
                            .incrementer(new RunIdIncrementer())
                            .start(flow1())
                            .split(taskExecutor()).add(flow2())
                            .end()
                            .build();
}

@Bean
public Flow flow1() {
    TaskletStep step1 = stepBuilderFactory.get("step1")
                                         .tasklet(tasklet())
                                         .build();

    return new FlowBuilder<Flow>("flow1")
            .start(step1)
            .build();
}

@Bean
public Flow flow2() {
    TaskletStep step2 = stepBuilderFactory.get("step2")
                                         .tasklet(tasklet())
                                         .build();

    TaskletStep step3 = stepBuilderFactory.get("step3")
                                         .tasklet(tasklet())
                                         .build();

    return new FlowBuilder<Flow>("flow2")
            .start(step2)
            .next(step3)
            .build();
}

@Bean
public Tasklet tasklet() {
    return new CustomTasklet();
}

public class CustomTasklet implements Tasklet {

    private long sum;

    @Override
    public RepeatStatus execute(StepContribution contribution, ChunkContext chunkContext) throws Exception {
        for (int i = 0; i < 100000000; i++) {
            sum++;
        }
        System.out.printf("%s has been executed on thread %s\n", chunkContext.getStepContext().getStepName(), Thread.currentThread().getName());
        System.out.println("sum: " + sum);
        return RepeatStatus.FINISHED;
    }
}
결과는 다음과 같이 나왔다.

flow1과 flow2가 병렬로 돌아가는 것을 확인할 수 있고, flow2 내부에서 step2가 끝난 후에 step3를 실행하게끔 하였기 때문에 step2가 끝난 후에 step3이 돌아간 것을 확인할 수가 있었다.
sum값이 1억, 2억, 3억 이렇게 찍혀야 되는데 이상한 값으로 찍힌 이유는 CustomTasklet을 빈 등록하여서 싱글턴 객체가 되었는데 내부 공유 변수가 있어 데이터 동기화 문제가 일어난 것이다. 빈 등록을 해제해주어 싱글턴으로 사용을 하지 말던가 아니면 동기화 처리를 해주면 된다.
public class CustomTasklet implements Tasklet {

    private long sum;
    private Object object = new Object();

    @Override
    public RepeatStatus execute(StepContribution contribution, ChunkContext chunkContext) throws Exception {
        synchronized (object){
            for (int i = 0; i < 100000000; i++) {
                sum++;
            }
            System.out.printf("%s has been executed on thread %s\n", chunkContext.getStepContext().getStepName(), Thread.currentThread().getName());
            System.out.println("sum: " + sum);
        }
        return RepeatStatus.FINISHED;
    }
}
간단히 동기화 처리를 해주면 정상적으로 sum이 찍히는 것을 확인할 수가 있다. 하지만, synchronized를 사용함으로써 처리 속도가 그만큼 떨어지게 된다.
@Bean
public Job job() throws RetryableException {
    return jobBuilderFactory.get("Job")
                            .incrementer(new RunIdIncrementer())
                            .start(flow1())
                            .split(taskExecutor()).add(flow2())
                            .next(flow2())
                            .end()
                            .build();
}
이번에는 split이후에 next를 하나 더 넣어서 flow2를 다시 실행해보겠다.

쓰레드명을 살펴보면 next 단계에서 실행된 flow2는 메인 쓰레드로 처리된 것을 확인할 수가 있다. split 까지 병렬처리를 하다가 병렬 처리하던 쓰레드를 모두 완료한 후에 next로 넘어갔고 여기서 부터는 동기로 이루어지니 메인 쓰레드가 처리한 것으로 유추할 수가 있다.
Partitioning
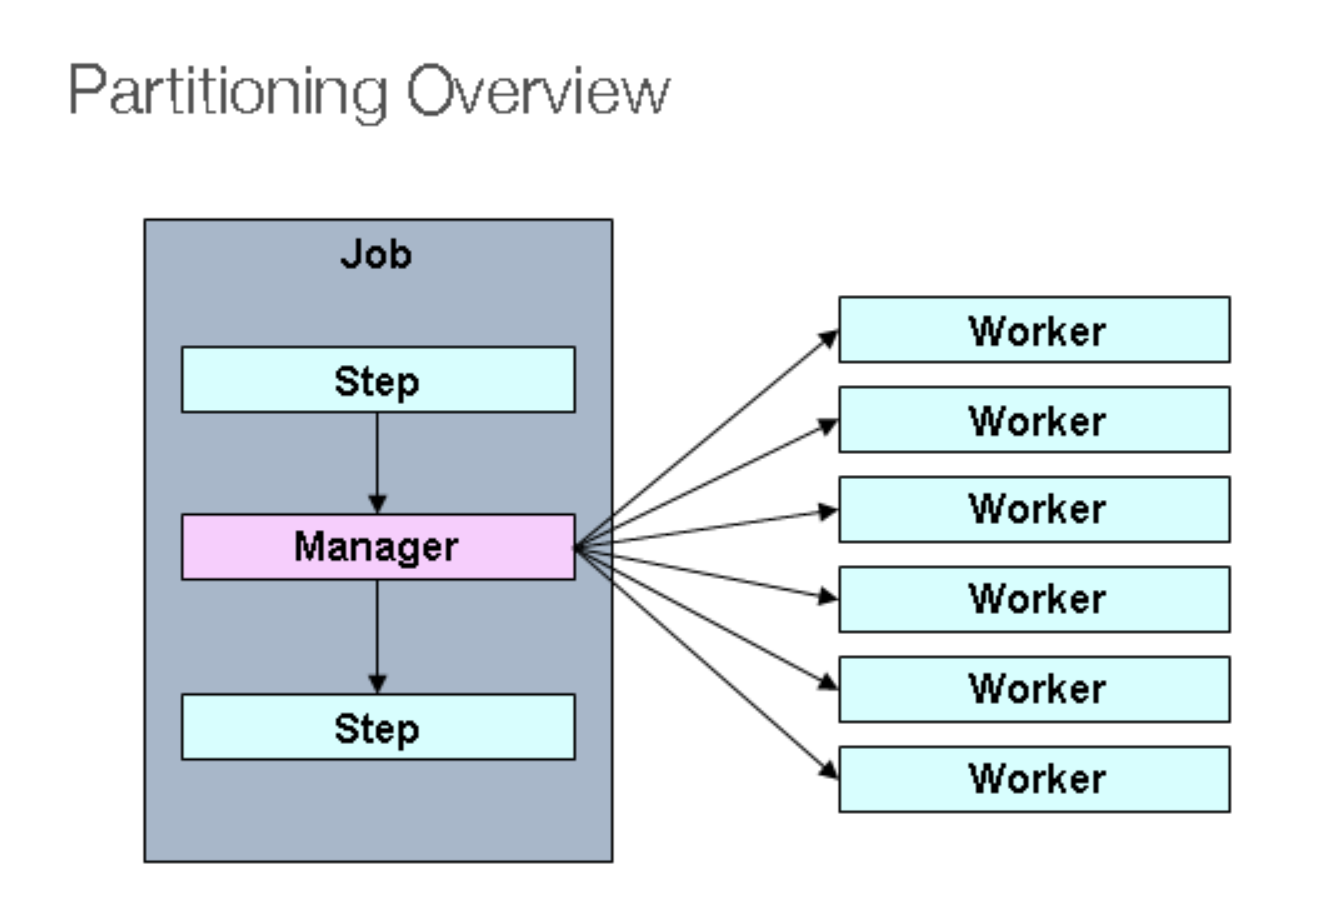
- MasterStep이 SlaveStep을 실행시키는 구조
- SlaveStep은 각 스레드에 의해 독립적으로 실행이 됨
- SlaveStep은 독립적인 StepExecution 파라미터 환경을 구성함
- SlaveStep은 ItemReader / ItemProcessor / ItemWriter 등을 가지고 동작하며 직업을 독립적으로 병렬 처리함
- MasterStep은 PartitionStep이며 SlaveStep은 TaskletStep, FlowStep 등이 올 수 있음
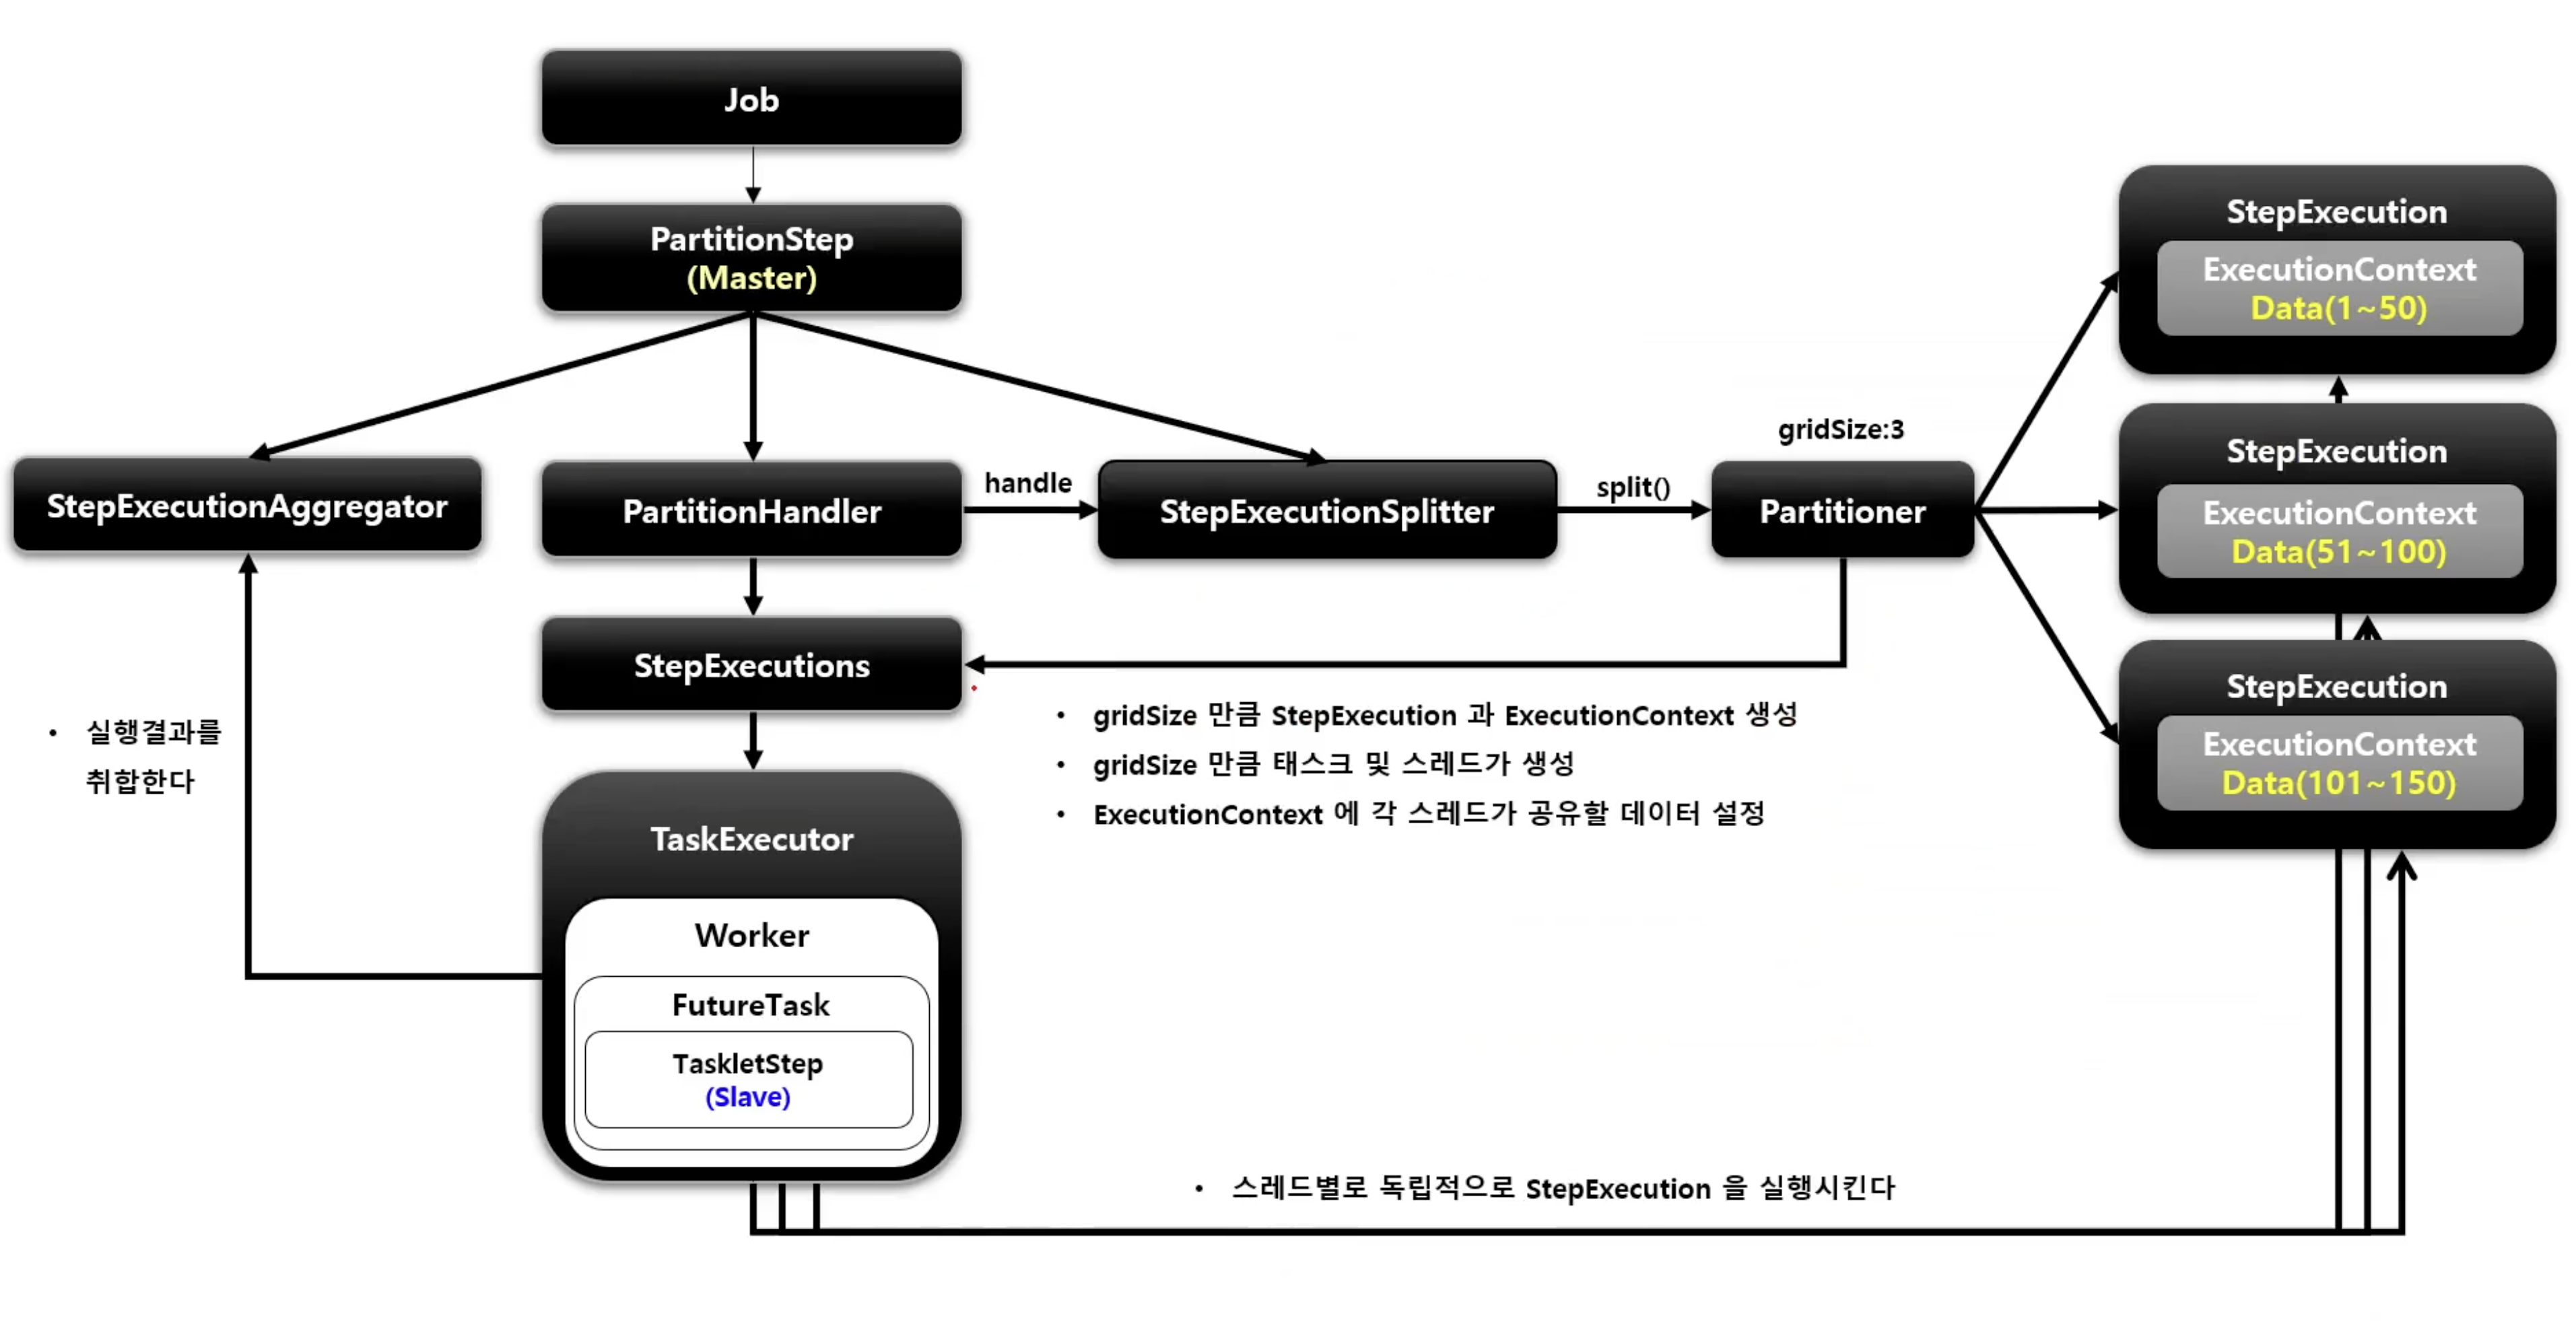
주요 클래스는 다음과 같다.
- PartitionStep
- 파티셔닝 기능을 수행하는 Step 구현체
- 파티셔닝을 수행 후 StepExecutionAggregator를 사용해서 StepExecution의 정보를 최종 집계한다
- PartitionHandler
- PartitionStep에 의해 호출되며 스레드를 생성해서 WorkStep을 병렬로 실행한다
- WorkStep에서 사용할 StepExecution 생성은 StepExecutionSplitter와 Partitioner에게 위임한다
- WorkStep을 병렬로 실행 후 최종 결과를 담은 StepExecution을 PartitionStep에 반환한다
- StepExecutionSplitter
- WorkStep에서 사용할 StepExecution을 gridSize 만큼 생성한다 (gridSize가 곧 스레드의 수)
- Partitioner를 통해 ExecutionContext를 얻어서 StepExecution에 매핑한다
- Partitioner
- StepExecution에 매핑 할 ExecutionContext를 gridSize 만큼 생성한다
- 각 ExecutionContext에 저장된 정보는 WorkStep을 실행하는 스레드마다 독립적으로 참조 및 활용 가능하다
흐름은 대략 아래와 같다.
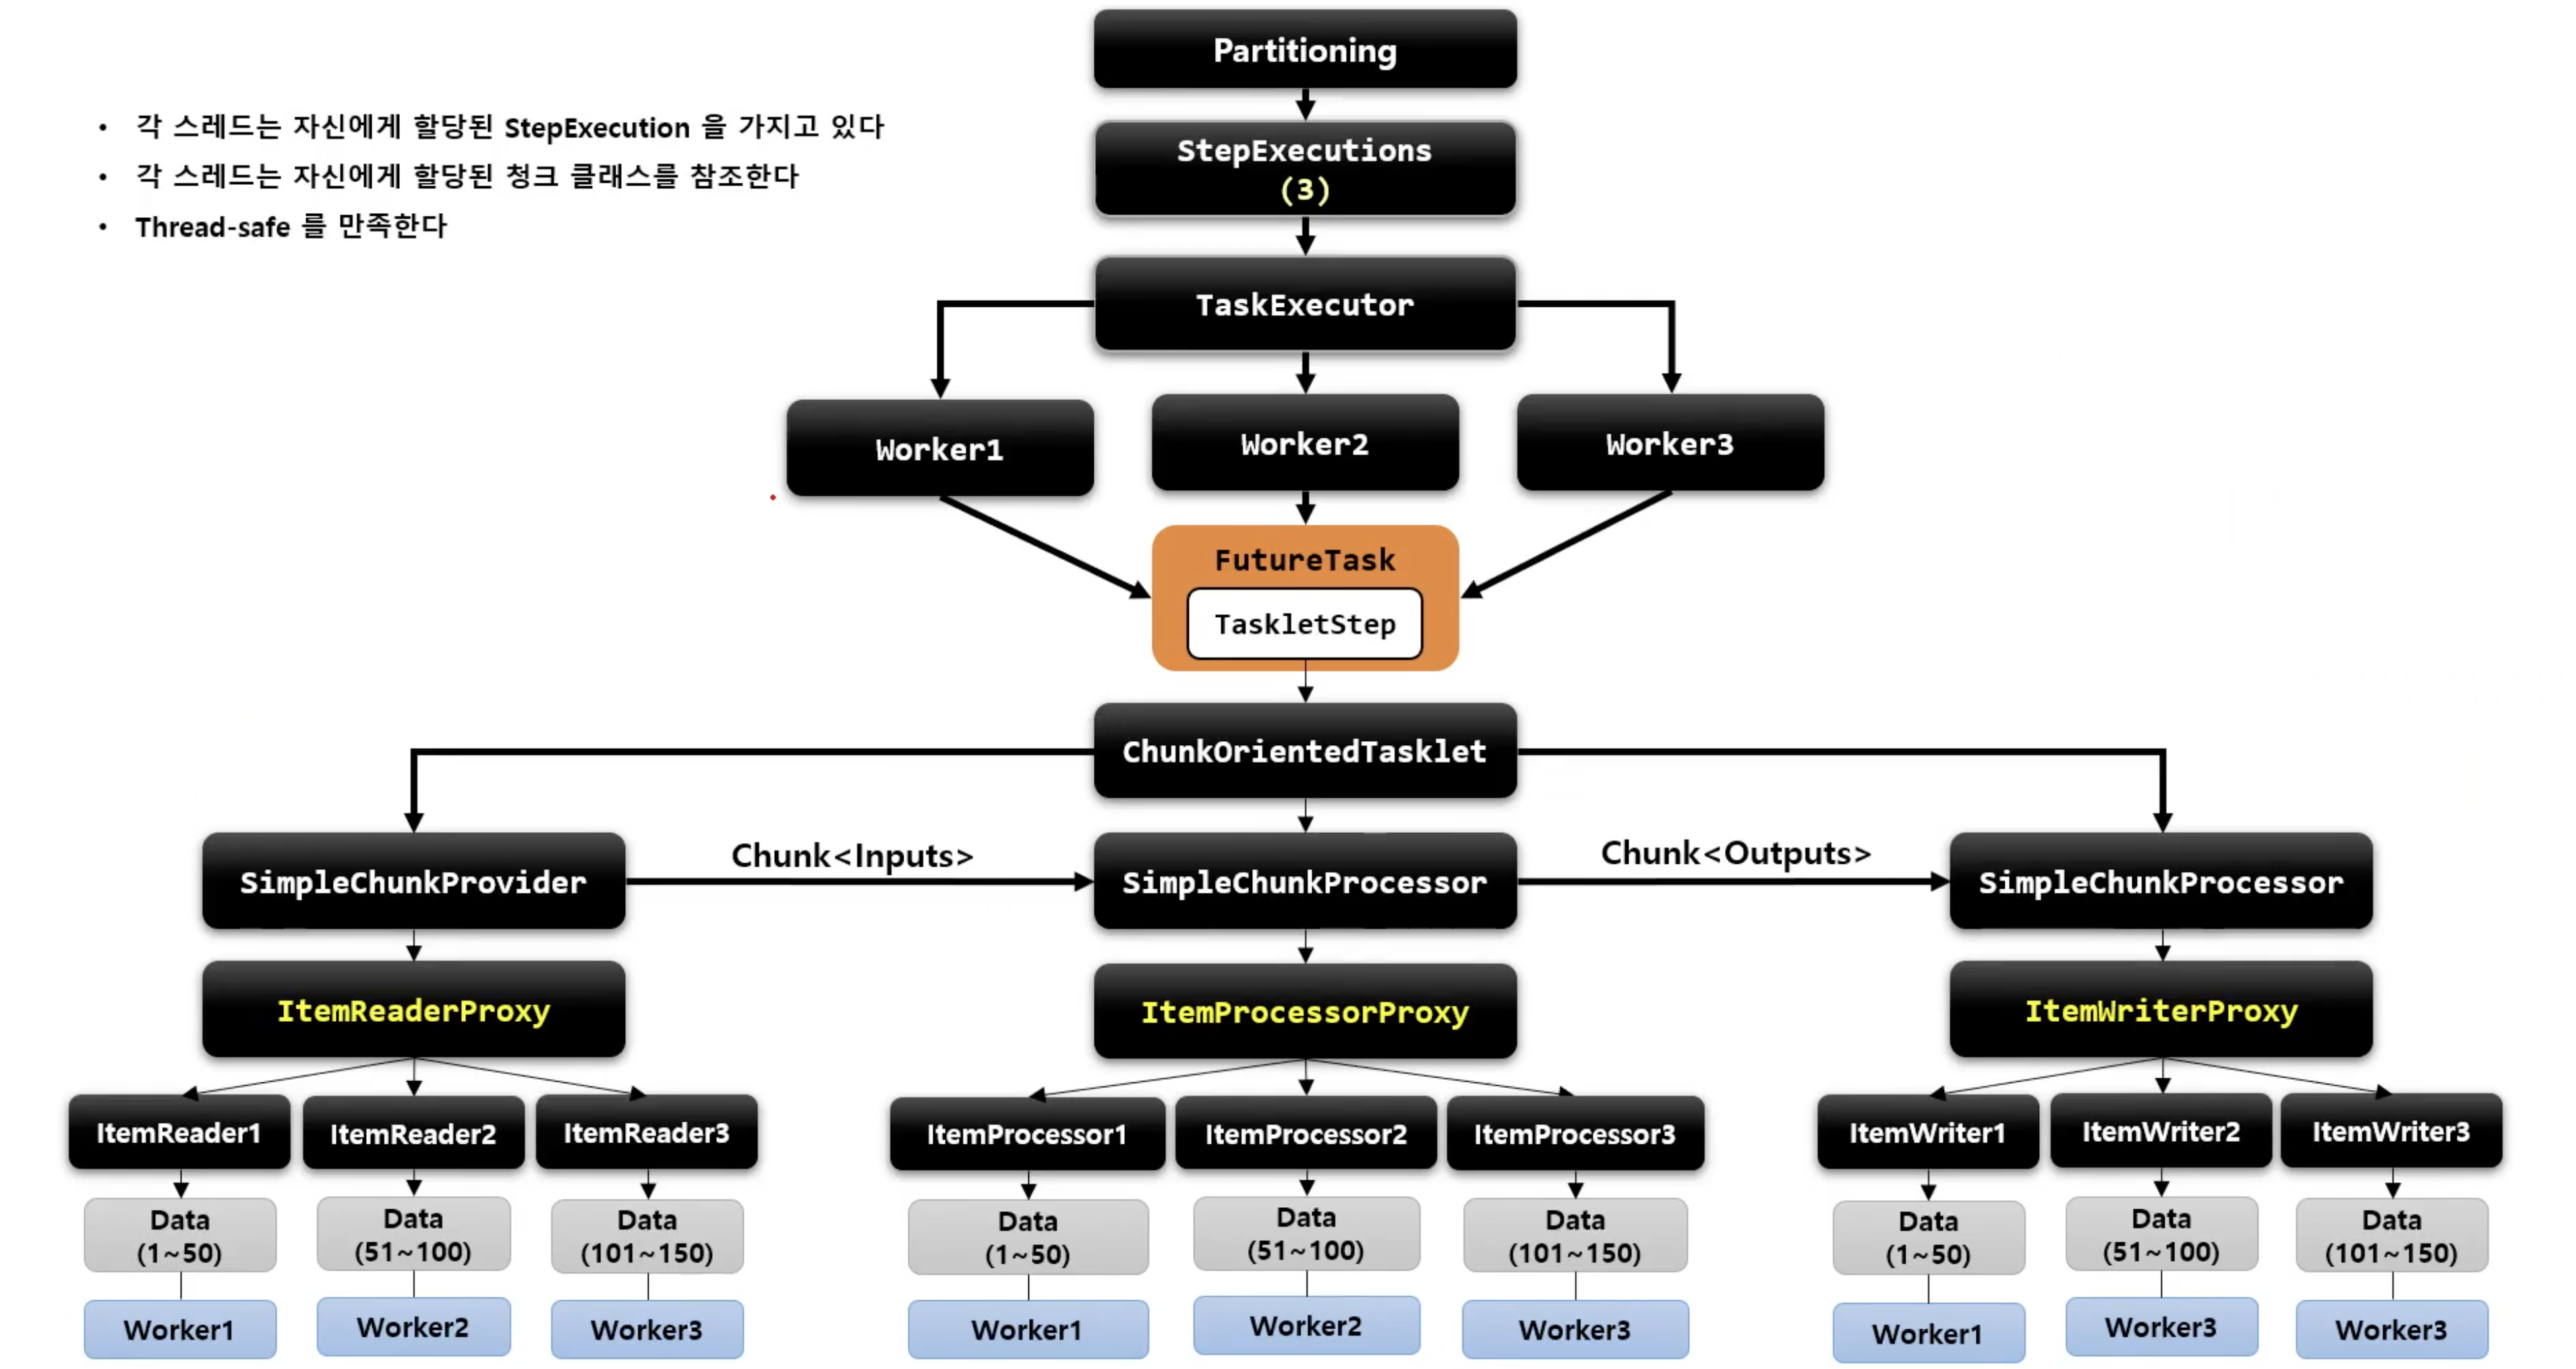
이제 코드로 살펴보겠다.
@Bean
public Job job() throws RetryableException {
    return jobBuilderFactory.get("Job")
                            .incrementer(new RunIdIncrementer())
                            .start(masterStep())
                            .build();
}

@Bean
public Step masterStep() {
    return stepBuilderFactory.get("masterStep")
                             .partitioner(slaveStep().getName(), partitioner()) // 1
                             .step(slaveStep()) // 2
                             .gridSize(4) // 3
                             .taskExecutor(new SimpleAsyncTaskExecutor()) //4
                             .build();
}- 1:
PatitionStepBuilder가 생성되고Partitioner를 설정 - 2: 슬레이브 역할의
Step을 설정 - 3: 몇 개의 파티션으로 나눌 것인지 gridSize 설정
- 4: 스레드 풀 실행자 설정
@Bean
public Step slaveStep() {
    return stepBuilderFactory.get("slaveStep")
                             .<Customer, Customer>chunk(100)
                             .reader(itemReader(null, null))
                             .writer(대충writer)
                             .build();
}

@Bean
public Partitioner partitioner() {
    return new ColumnRangePartitioner();
}

@Bean
@StepScope
public ItemReader<Customer> itemReader(
        @Value("#{stepExecutionContext['minValue']}") Long minValue,
        @Value("#{stepExecutionContext['maxValue']}") Long maxValue
) {
    //대충 쿼리 관련 코드들...
    "where id >= " + minValue + "and id <= " + maxValue
}

public class ColumnRangePartitioner implements Partitioner {

    ...
    @Override
    public Map<String, ExecutionContext> partition(int gridSize) {
        int min = jdbcTemplate.queryForObject("SELECT MIN(" + column + ") from " + table, Integer.class);
        int max = jdbcTemplate.queryForObject("SELECT MAX(" + column + ") from " + table, Integer.class);
        int targetSize = (max - min) / gridSize + 1;

        Map<String, ExecutionContext> result = new HashMap<>();
        int number = 0;
        int start = min;
        int end = start + targetSize - 1;

        while (start <= max) {
            ExecutionContext value = new ExecutionContext();
            result.put("partition" + number, value);

            if (end >= max) {
                end = max;
            }
            value.putInt("minValue", start);
            value.putInt("maxValue", end);
            start += targetSize;
            end += targetSize;
            number++;
        }

        return result;
    }
}
위 코드를 간략히 말하자면, 파티셔너에서 girdSize를 이용해서 minValue와 maxValue를 설정한다. 해당 테이블에 1000개의 데이터가 있다면 minValue와 maxValue의 값이 1250, 251500, 501750, 7511000 가 될 것이고 이것들이 StepExecutionContext에 저장이된다.
이제 gridSize 개수 만큼의 쓰레드가(SimpleAsyncTaskExecutor는 요청이 오는대로 쓰레드를 생성함, Async 관련 링크) 각각 스텝을 돌면서 StepExecutionContext 에서 minValue와 maxValue를 꺼내 read하고 그 결과들을 모아 writer에게 전달하게 된다.
실행순서
"masterStep" 및 "slaveStep" 스텝 생성. 여기서 "masterStep" 은 partition 빌더를 이용하였기 때문에
PartitionStep으로 생성된다.PartitionStep에서partitionHandler.handle을 통해 파티셔닝을 한다. "masterStep"의 stepExecution을 참조해서 "slaveStep"의 stepExecution을 생성해주기 때문에 파라미터로 "masterStep"의 stepExecution을 전달해 준 것이다.
PartitionHandler에서 쓰레드를 실행시키는 역할을 하는데 그 전에 각각의 쓰레드를 만들고 그 쓰레드에 배당되어야 할 각 StepExecution 객체를 만든다.StepExecutionSplitter가 gridSize 만큼 StepExecution을 생성 후 반환하게 된다.
StepExecutionSpliter는 ExecutionContext를 생성하게 되는데 이 역할을Partitioner한테 위임한다.

첫 라인의
stepExecution은 "masterStep"의 것이다.JobExecution을 뽑고,getContexts메서드를 호출하게 된다.
splitSize는 gridSize로 설정해둔 4가 될 것이고Partitioner의partition메서드를 호출하게된다.
위에 작성해둔ColumnRangePartitioner의partition메서드를 통해 gridSize 만큼의ExecutionContextmap이 반환이 된다.
다시split메서드로 돌아와서 생성된 context만큼 stepName을 만들고 이를 이용해StepExecution을 만들고 "masterStep"의StepExecution을 사용해 뽑아놨던JobExecution에 생성한StepExecution을 생성해준다. 최종적으로 set에는 4개의StepExecution이 담기게 된다.이제
PartitionHandler가 4개의StepExecutionContext를 쓰레드가 실행하도록doHandle메서드를 호출하게 된다.


쓰레드가 실행하게할 task를 만드는 메서드인 createTask 를 살펴보면 스텝이 stepExecution을 실행하게끔 되어있다. 이게 무슨뜻이냐면 slave 스텝은 4개가 생성되는 것이 아니라 단 1개만 생성되어 stepExecution을 처리하게 되는 것이다. 이렇게 수행을 하게 된다.
SynchronizedItemStreamReader
- Thread-saf 핳지 않은 ItemReader를 Thread-safe 하게 처리하도록 하는 역할을 한다
- Spring Batch 4.0 부터 지원한다


REFERENCE
정수원님 스프링 배치 강의
'Spring' 카테고리의 다른 글
| [Spring] Filter와 server.compression 설정을 통한 api 압축 (0) | 2023.07.29 |
|---|---|
| [Spring Batch] 이벤트 리스너 내용 정리 (0) | 2023.05.04 |
| [Spring] Spring Data MongoDB 잊어버리는 것들 정리 (0) | 2023.02.09 |
| [Spring Batch] @JobScope, @StepScope 에 대해 (0) | 2022.11.15 |
| [Spring Batch] 도메인 정리 (1) | 2022.11.15 |